
A poorly lit living room feels flat, cramped, and uninviting, no matter how nice the furniture. The right lighting design transforms the same space into something warm, functional, and visually interesting. This isn’t about choosing a single overhead fixture and calling it done. Good living room lighting layers multiple sources at different heights and intensities to support everything from reading to entertaining guests. Whether working with a new build or retrofitting an existing room, understanding how light types, fixture choices, and controls work together makes the difference between “fine” and “exactly right.”
Table of Contents
ToggleKey Takeaways
- Living room lighting design requires layering three types—ambient, task, and accent lighting—at different heights and intensities to create a functional and inviting space.
- Aim for 1,500 to 3,000 lumens of ambient lighting in an average living room, distributed across multiple sources rather than a single overhead fixture to eliminate harsh shadows.
- Task lighting positioned 40 to 42 inches above seating prevents eye strain during reading and focused activities, making dedicated floor or table lamps essential.
- Accent lighting should be roughly three times brighter than ambient light to highlight focal points like artwork or architectural features without over-accenting the entire room.
- Smart dimmer switches and smart bulbs enable flexible control, allowing a single lighting layout to adapt from bright activity lighting to soft atmospheric lighting for entertaining.
- Always shut off power at the breaker and use a non-contact voltage tester before installing new fixtures, and hire a licensed electrician when running new circuits or working with older electrical systems.
Understanding the Three Essential Types of Living Room Lighting
Every effective lighting plan combines three distinct types: ambient, task, and accent. Each serves a specific function, and skipping any one leaves gaps in usability or visual appeal. Think of it like building a room’s foundation, walls, and trim, all three layers matter.
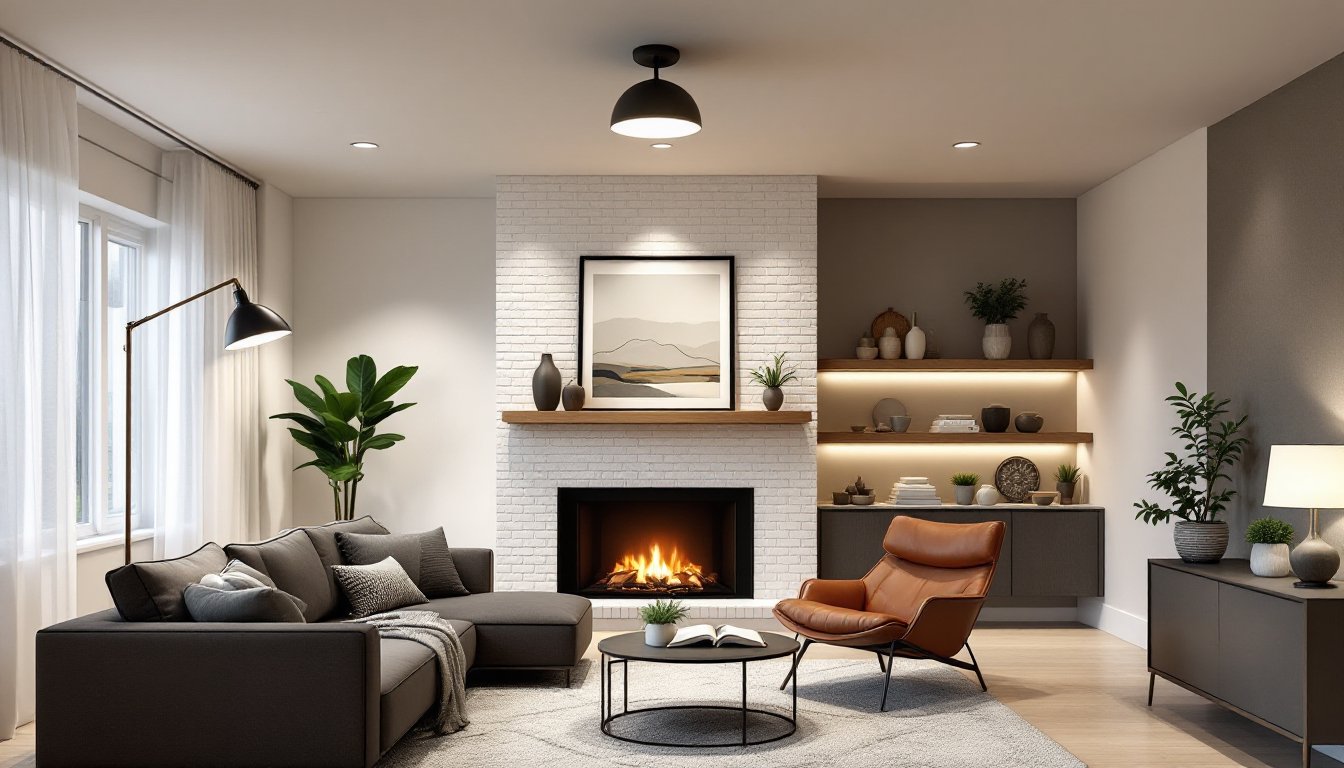
Ambient Lighting: Your Room’s Foundation
Ambient lighting provides general illumination for the entire room. It’s the baseline that lets people move safely and comfortably without squinting or tripping. Common sources include ceiling-mounted fixtures (flush-mount or semi-flush styles), recessed cans (typically 4-inch or 6-inch housings), and chandeliers.
For an average living room (roughly 12×16 feet), aim for around 1,500 to 3,000 lumens total ambient output, depending on ceiling height and wall color. Dark walls absorb more light: white or light-colored surfaces reflect it. Recessed downlights spaced 4 to 6 feet apart work well in rooms with 8- to 9-foot ceilings. Higher ceilings benefit from pendant fixtures or chandeliers that bring the light source closer to the living plane.
Many homeowners default to a single center ceiling fixture, but that creates harsh shadows and uneven coverage. Distributing ambient sources, like pairing a central fixture with perimeter recessed lights, yields more uniform, flattering illumination.
Task Lighting: Focused Illumination for Activities
Task lighting directs light where it’s needed for specific activities: reading, crafting, playing board games, or working on a laptop. Unlike ambient lighting, task sources are localized and adjustable.
Popular task fixtures include:
- Floor lamps with adjustable arms or gooseneck heads
- Table lamps placed beside seating
- Swing-arm wall sconces mounted near reading chairs
- Pharmacy-style lamps with pivoting shades
For reading, position the light source 40 to 42 inches above the seat cushion and slightly behind or to the side to minimize glare. LED bulbs in the 450 to 800 lumen range (roughly 40 to 60 watts incandescent equivalent) provide adequate brightness without overpowering the space. Choose fixtures with opaque or translucent shades to reduce direct glare on screens or glossy pages.
Don’t assume overhead ambient lighting suffices for tasks. A ceiling fixture 8 feet above a reader creates shadows and eye strain. Dedicated task lights make activities more comfortable and reduce fatigue, which matters when those design and decor choices include cozy reading nooks.
Accent Lighting: Adding Drama and Depth
Accent lighting highlights architectural features, artwork, plants, or textured walls. It’s purely aesthetic but critical for visual interest. Accent sources create depth by establishing contrast between brightly lit focal points and surrounding dimmer areas.
Common accent fixtures:
- Track lighting or monorail systems aimed at art or shelving
- Picture lights mounted above framed pieces
- In-wall uplights or LED strip lights behind crown molding or floating shelves
- Narrow-beam recessed cans (typically 15- to 25-degree beam angles)
A general rule: accent lighting should be roughly three times brighter than ambient lighting at the focal point to create noticeable contrast. For example, if ambient light provides 30 foot-candles in the room, aim for 90 foot-candles on the artwork.
Avoid over-accenting. Highlighting too many elements dilutes impact and creates visual clutter. Pick two or three focal points per room, a fireplace mantel, a large canvas, or a feature wall, and let those shine.
Choosing the Right Light Fixtures for Your Living Room Style
Fixture selection balances function, scale, and aesthetic. A chandelier that works in a two-story great room overwhelms a standard 8-foot ceiling, and a minimalist sconce feels out of place in a traditional Victorian setting.
Ceiling-mounted fixtures should scale to room size. For flush or semi-flush mounts, measure room length plus width in feet, then convert to inches for fixture diameter. A 12×14-foot room (26 feet total) suits a 26-inch diameter fixture. Chandeliers hung over seating areas should sit 30 to 36 inches above the coffee table or 7 feet minimum above the floor to prevent head bumps.
Recessed lighting works in nearly any style but requires access above the ceiling (not always feasible in finished spaces without cutting drywall). Use IC-rated housings if the ceiling is insulated, and airtight (AT) rated cans in climates where energy codes require sealed penetrations. Retrofit LED modules simplify installation in existing cans.
Floor and table lamps should complement furniture scale. A petite side table pairs better with a slim candlestick lamp than a chunky ceramic base. Lamp shades shouldn’t obstruct sightlines when seated, bottom of the shade should sit at or below eye level.
Style matching matters. Modern and contemporary rooms lean toward clean-lined fixtures in brushed nickel, matte black, or chrome with geometric shapes. Traditional and transitional spaces favor aged brass, oil-rubbed bronze, or antique pewter finishes with curved arms and fabric shades. Farmhouse and industrial styles embrace exposed bulbs, galvanized metal, and wood accents. Design experts at House Beautiful frequently showcase how fixture finishes tie a room together.
Don’t mix more than three different metal finishes in one room, it looks disjointed. If existing hardware is brushed nickel, stick with that family across light fixtures, switch plates, and cabinet pulls.
Planning Your Living Room Lighting Layout
A successful lighting layout starts with a floor plan and an honest assessment of how the room gets used. Sketch furniture placement, note windows and natural light sources, and identify task zones (reading chair, desk area, media console).
Step 1: Map ambient sources. Decide whether to use a central fixture, perimeter recessed lights, or a combination. Avoid placing recessed cans directly above seating, downlights create unflattering shadows on faces. Position them closer to walls to wash vertical surfaces and create ambient glow.
Step 2: Add task lighting. Place floor or table lamps within arm’s reach of seating used for reading or hobbies. For media walls, add bias lighting (LED strips behind the TV) to reduce eye strain during screen time.
Step 3: Layer in accent lighting. Identify one or two focal points per wall. Install picture lights, track heads, or narrow-beam recessed fixtures aimed at those features. Avoid lighting every wall, leave some areas in relative shadow for contrast.
Step 4: Consider electrical requirements. Most floor and table lamps plug into existing outlets, but wall sconces, recessed cans, and hardwired pendants require electrical boxes. NEC (National Electrical Code) requires receptacles every 12 feet along walls and within 6 feet of doorways. Adding new circuits or moving boxes usually requires a licensed electrician and permits, especially if running wire through finished walls or ceilings.
If adding recessed lighting to an existing ceiling, check for joists, ductwork, and insulation before cutting holes. A stud finder with AC wire detection helps avoid cutting into electrical runs. Remodel-style recessed housings (with integrated clips) install from below without attic access, but new-construction cans require access from above.
For rooms with limited electrical access, consider battery-powered puck lights for accent lighting or plug-in track systems that mount to the ceiling and connect to a single outlet, useful in rentals or spaces where running new wire isn’t practical.
When planning the layout, those familiar with lighting fundamentals know that spacing fixtures evenly doesn’t always mean better coverage. Asymmetry often works better for creating visual interest and avoiding the “office cubicle” feel of uniform grid spacing.
Smart Lighting Controls and Dimming Options
Dimming and control systems let a single lighting layout serve multiple needs: bright for cleaning and game nights, soft for movie watching, somewhere in between for everyday conversation.
Dimmer switches replace standard toggle switches and adjust light intensity. Not all bulbs dim well, check packaging for “dimmable” labels. LED bulbs require compatible dimmers: older incandescent-only dimmers cause LEDs to flicker or hum. Look for dimmers rated for LED/CFL use, like Lutron’s Diva or Maestro lines.
Installing a dimmer is straightforward for anyone comfortable with basic electrical work (always shut off the breaker first). Standard single-pole dimmers replace single switches: three-way dimmers work in circuits controlled from two locations. If unsure about wiring or dealing with aluminum wire (common in homes built 1965–1973), hire a licensed electrician. Aluminum requires special handling and anti-oxidant paste to prevent overheating.
Smart lighting controls add another layer of flexibility:
- Smart bulbs (Philips Hue, LIFX, Wyze) screw into standard sockets and connect via Wi-Fi or Bluetooth. Control brightness, color temperature, and scheduling from a smartphone. No wiring changes required.
- Smart switches (Lutron Caseta, TP-Link Kasa) replace existing wall switches and control any connected fixture. They integrate with voice assistants and home automation hubs like Amazon Alexa, Google Home, or Apple HomeKit.
- Smart plugs turn floor and table lamps into controllable devices without rewiring.
Smart systems enable scenes, preset combinations of light levels across multiple fixtures. A “Movie Night” scene might dim recessed lights to 20%, turn off task lamps, and activate bias lighting behind the TV. An “Entertaining” scene brings everything up to 80% for full brightness.
Color temperature matters as much as dimming. Warmer light (2700K to 3000K) feels cozy and flattering in living spaces. Cooler light (4000K to 5000K) energizes but feels clinical. Many smart bulbs offer tunable white, adjusting from warm to cool throughout the day to match natural circadian rhythms, a feature increasingly highlighted by interior design pros.
For those new to layered lighting strategies, smart controls simplify switching between layers without installing multiple switches. A single app replaces fumbling with four different wall switches.
Safety note: Always wear safety glasses when cutting ceiling holes for recessed lights, drywall dust and debris fall directly into eyes. Use a dust mask if working in spaces with old insulation (fiberglass or cellulose particles irritate lungs). Shut off power at the breaker, not just the switch, before touching any wiring. A non-contact voltage tester confirms circuits are dead before making connections.
Dimming also extends bulb life and reduces energy use. Running LEDs at 50% brightness can double lifespan and cut electricity consumption proportionally, a win for both the electric bill and the environment.


