
LED bulbs have revolutionized outdoor lighting, offering homeowners brighter, longer-lasting, and more efficient solutions than traditional halogen or incandescent options. Whether upgrading an existing landscape lighting system or starting fresh, choosing the right LED bulbs can dramatically improve curb appeal, security, and nighttime usability of outdoor spaces. This guide walks through everything needed to select, install, and optimize LED bulbs for landscape applications, from understanding bulb types and color temperatures to ensuring compatibility with existing fixtures.
Table of Contents
ToggleKey Takeaways
- LED bulbs for landscape lighting consume 80-90% less energy than halogen equivalents and last 25,000 to 50,000 hours, reducing operating costs and replacement frequency for outdoor fixtures.
- MR16 and PAR LED bulbs dominate landscape applications; MR16s work best for low-voltage 12V systems with variable beam angles from 15° to 60°, while PAR bulbs suit higher lumen demands for security or long-distance uplighting.
- Choose 2700K-3000K warm white color temperature for most residential landscapes to replicate traditional halogen warmth; neutral 3500K-4000K works for modern architecture, while cool white 5000K+ is rarely appropriate.
- Verify transformer compatibility, voltage (12V or 120V), base type (GU5.3, E26), and physical fit before purchasing landscape lighting LED bulbs to avoid flickering, premature failure, or installation errors.
- Always disconnect power before installing LED bulbs, clean sockets to remove corrosion, and test each fixture individually before reassembling to ensure optimal performance and safety in outdoor environments.
- Brightness depends on application, not wattage—check lumen ratings rather than watts; path lights need 50-100 lumens, accent uplights 200-400 lumens, and security fixtures 700-1500+ lumens based on distance and desired effect.
Why LED Bulbs Are the Smart Choice for Landscape Lighting
LED bulbs consume 80-90% less energy than halogen equivalents, which matters when running multiple fixtures nightly. A typical 12V landscape lighting system with ten 20-watt halogen bulbs draws 200 watts total. Swap those for 3-watt LEDs and total draw drops to 30 watts, a substantial reduction over months of operation.
Lifespan is another major advantage. Quality LED landscape bulbs last 25,000 to 50,000 hours compared to 2,000-4,000 hours for halogens. That translates to roughly 15-25 years of typical evening use before replacement, eliminating the hassle of frequent bulb swaps in hard-to-reach fixtures.
LEDs also produce far less heat. Halogen bulbs can reach 400°F at the glass surface, creating burn hazards and degrading fixture components over time. LEDs run cool enough to touch after hours of operation, extending fixture longevity and reducing fire risk around dry mulch or vegetation.
Durability matters outdoors. LED bulbs resist vibration and impact better than fragile halogen filaments. They also perform reliably in temperature extremes, from sub-zero winter nights to summer heat exceeding 100°F, without flickering or premature failure. Many modern outdoor lighting designs prioritize LED compatibility for these exact reasons.
Types of LED Bulbs for Landscape Lighting Applications
MR16 and MR11 LED Bulbs
MR16 bulbs are the workhorses of low-voltage landscape lighting. The “MR” stands for multifaceted reflector, and the “16” refers to the diameter in eighths of an inch (16/8 = 2 inches). These bulbs use GU5.3 or GX5.3 bi-pin bases rated for 12V systems, the standard for most residential landscape setups.
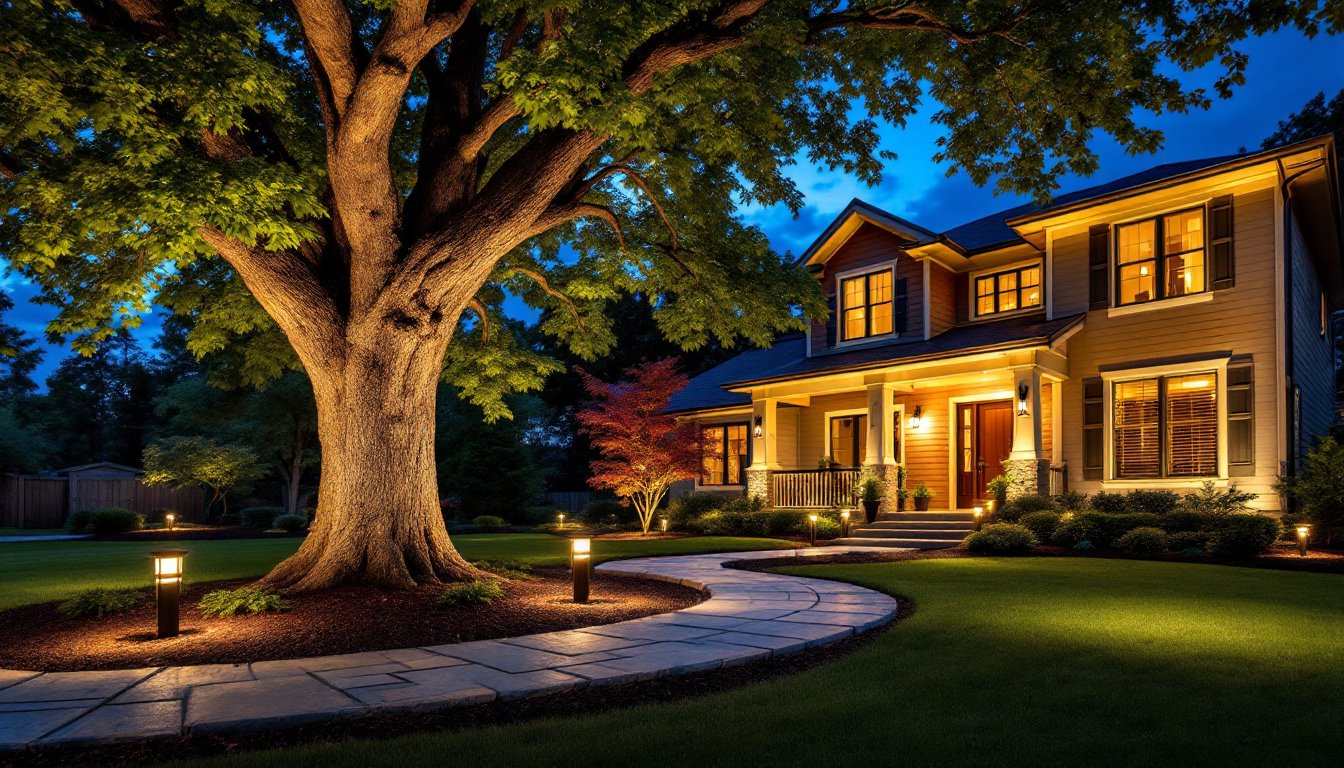
MR16 LEDs work well for spotlighting trees, architectural features, and signage. Beam angles range from narrow 15° spots to wide 60° floods. A narrow beam concentrates light up a tall oak trunk, while a wide flood washes across a garden bed or building facade.
MR11 bulbs follow the same naming convention but measure 11/8 inch (approximately 1.375 inches) in diameter. They fit smaller fixtures and produce less output than MR16s, making them suitable for subtle path lighting or low-profile accent work where the fixture itself should disappear.
Both types come in dimmable and non-dimmable versions. Verify dimmer compatibility before purchasing, not all LED drivers play well with magnetic low-voltage transformers common in older landscape systems.
PAR and BR LED Bulbs
PAR (parabolic aluminized reflector) bulbs typically run on 120V line voltage and suit applications like security lighting, large tree uplighting, or illuminating tall walls. PAR20, PAR30, and PAR38 sizes (diameter in eighths of an inch) offer increasing output and beam control.
PAR LEDs deliver higher lumen output than MR16s, useful when fixtures sit farther from the target or when competing with ambient light from street lamps or neighboring properties. The built-in reflector provides precise beam shaping without requiring additional optics in the fixture.
BR (bulged reflector) bulbs share similar applications but produce softer, more diffused light due to their rounded reflector shape. They work well for general area lighting along driveways or patios where harsh shadows aren’t desirable. Many homeowners exploring current lighting trends find that warmer PAR and BR LEDs blend better with natural evening tones than older cool-white options.
Choosing the Right Color Temperature and Brightness
Color temperature, measured in Kelvin (K), dramatically affects the mood and appearance of landscaping. Most landscape lighting falls into three ranges:
• 2700K-3000K (Warm White): Mimics incandescent or halogen light. Creates inviting, cozy ambiance. Best for pathways, patios, and residential gardens. Makes warm-toned materials like wood, brick, and terracotta look natural.
• 3500K-4000K (Neutral White): Balances warmth and clarity. Works well for modern architecture, stainless steel fixtures, or stone features. Provides better color rendering for plant materials without the yellow cast of warm white.
• 5000K+ (Cool White): Crisp, blue-tinted light. Rarely appropriate for residential landscapes, feels clinical and harsh. Occasionally used for security lighting where maximum visibility outweighs aesthetics.
Stick with 2700K-3000K for most applications. It’s the closest match to traditional halogen landscape bulbs and provides the warm, welcoming glow homeowners expect.
Brightness requirements depend on application. Path lights typically need 50-100 lumens per fixture to define edges without glare. Accent uplights for trees or architecture range from 200-400 lumens depending on size and distance. Security/flood applications may require 700-1500 lumens or more.
Don’t confuse wattage with brightness. A 3-watt LED can produce the same 250 lumens as a 20-watt halogen. Always check the lumen rating on the package, it’s the only reliable measure of actual light output. Those new to lighting basics often make this mistake.
How to Select Compatible LED Bulbs for Your Existing Fixtures
Not all LED bulbs work with every fixture. Start by identifying the voltage of the system, most landscape lighting operates at 12V AC or 12V DC, though some line-voltage systems run at 120V AC.
Check the transformer or power supply. It should display output voltage and wattage capacity. A transformer rated for 300 watts can support up to 300 watts of total bulb load, but LED efficiency means that same transformer can now power many more fixtures. For example, replacing ten 20-watt halogens (200W total) with ten 3-watt LEDs (30W total) leaves 270 watts of unused capacity for expansion.
Verify the base type. Most low-voltage landscape fixtures use GU5.3, GX5.3, or wedge bases. Line-voltage fixtures typically use E26 medium screw bases (standard household size). Bring the old bulb to the store if unsure, base incompatibility is the most common purchase mistake.
Some older fixtures have built-in transformers designed for halogen bulbs. These may cause LED flickering, buzzing, or premature failure. Look for LED bulbs labeled “compatible with electronic or magnetic transformers” or consider upgrading to LED-specific drivers if problems persist. Resources on choosing the best lighting often highlight transformer compatibility as a critical step.
Physical fit matters too. Measure the fixture housing depth and compare against bulb length. Some LED bulbs include heat sinks or driver circuits that make them longer than the halogens they replace, potentially preventing the fixture lens from seating properly.
Finally, match the beam angle to the original bulb or adjust based on desired effect. Replacing a 60° flood halogen with a 15° spot LED will dramatically change the lighting pattern. Many manufacturers provide beam angle specifications on packaging or websites like Gardenista’s landscape lighting collection, which can help visualize different options.
Installation Tips for Landscape Lighting LED Bulbs
Always disconnect power before replacing bulbs. Flip the breaker or unplug the transformer. Even low-voltage systems can deliver uncomfortable shocks, and wet conditions outdoors increase conductivity.
Clean the fixture socket before installing new LEDs. Corrosion, spider webs, and moisture can prevent good electrical contact. Use a dry cloth or small brush to clear debris. If corrosion is present, apply a thin coat of dielectric grease to the socket contacts, it prevents future oxidation without interfering with conductivity.
Handle LED bulbs by the base, not the lens or heat sink. Oils from skin can create hot spots on lenses, and rough handling can damage internal components or solder joints.
Insert bi-pin bulbs firmly. GU5.3 and GX5.3 bases require a straight push, no twisting. If resistance is encountered, pull out and realign the pins with the socket slots. Forcing misaligned pins bends them or damages the socket.
For screw-base bulbs, tighten snugly but don’t over-torque. Plastic sockets in outdoor fixtures can crack if bulbs are forced. Hand-tight is sufficient for solid electrical contact.
Test each fixture before reassembling lenses or covers. Confirm the bulb illuminates and that beam angle and color temperature meet expectations. Making adjustments now beats climbing back up a ladder after dark.
Secure all fixture gaskets and seals when closing up. Even minor gaps allow moisture infiltration, which causes condensation, corrosion, and premature LED driver failure. Replace degraded gaskets, they’re inexpensive insurance.
If upgrading multiple fixtures, do it in stages. Replace a few bulbs, observe performance for a week, then continue. This approach catches compatibility issues early without committing to a full system swap. Homeowners looking for creative lighting ideas can experiment with mixed color temperatures or beam angles in different zones before finalizing choices.
Safety note: If fixtures are mounted higher than 10 feet or require working near power lines, hire a professional. Landscape lighting rarely requires permits, but working safely around ladders and electricity does require good judgment. And if the existing wiring shows signs of damage, cracked insulation, exposed conductors, or burn marks, call an electrician before proceeding. Those exploring how to light outdoor spaces will find that proper installation prevents most long-term problems.
After installation, walk the property at night and evaluate results. Adjust fixture angles, swap beam spreads, or add/remove fixtures as needed. Essential lighting tips often emphasize that the best designs evolve through observation and tweaking, not one-time installation. Regional publications like Sunset frequently showcase how thoughtful adjustments to outdoor lighting transform evening landscapes into inviting, functional spaces.


