
Dark countertops make prep work harder. Shadows under cabinets hide what you’re chopping, make it tough to read recipes, and turn cooking into a squinting match. Under cabinet lighting solves that by putting focused light exactly where it’s needed. It’s one of the most practical upgrades a kitchen can get, better visibility, safer knife work, and a finished look that makes the whole space feel more polished. Whether someone’s remodeling or just tired of working in their own shadow, under cabinet lighting delivers real, everyday value.
Table of Contents
ToggleKey Takeaways
- Cabinet under lighting eliminates shadows and improves kitchen safety by directing focused task lighting onto countertops where food prep and detail work happen.
- LED strip lights offer budget-friendly flexibility for curved cabinets, while linear light bars provide the most professional finish and even illumination for serious kitchen remodels.
- The ideal brightness for cabinet under lighting is 300–500 lumens per linear foot, with a color temperature of 3000K–4000K to balance visibility with an inviting atmosphere.
- Plug-in under cabinet lighting installs in 1–3 hours without electrical expertise, while hardwired setups require proper NEC compliance and may need a licensed electrician.
- Dimming capability is essential for versatility, allowing you to shift from full task lighting during meal prep to soft ambient glow for evening entertaining.
- Mounting fixtures 2–3 inches from the cabinet face and measuring twice before ordering prevents shadows, installation delays, and ensures uniform light coverage across work surfaces.
What Is Cabinet Under Lighting and Why Does It Matter?
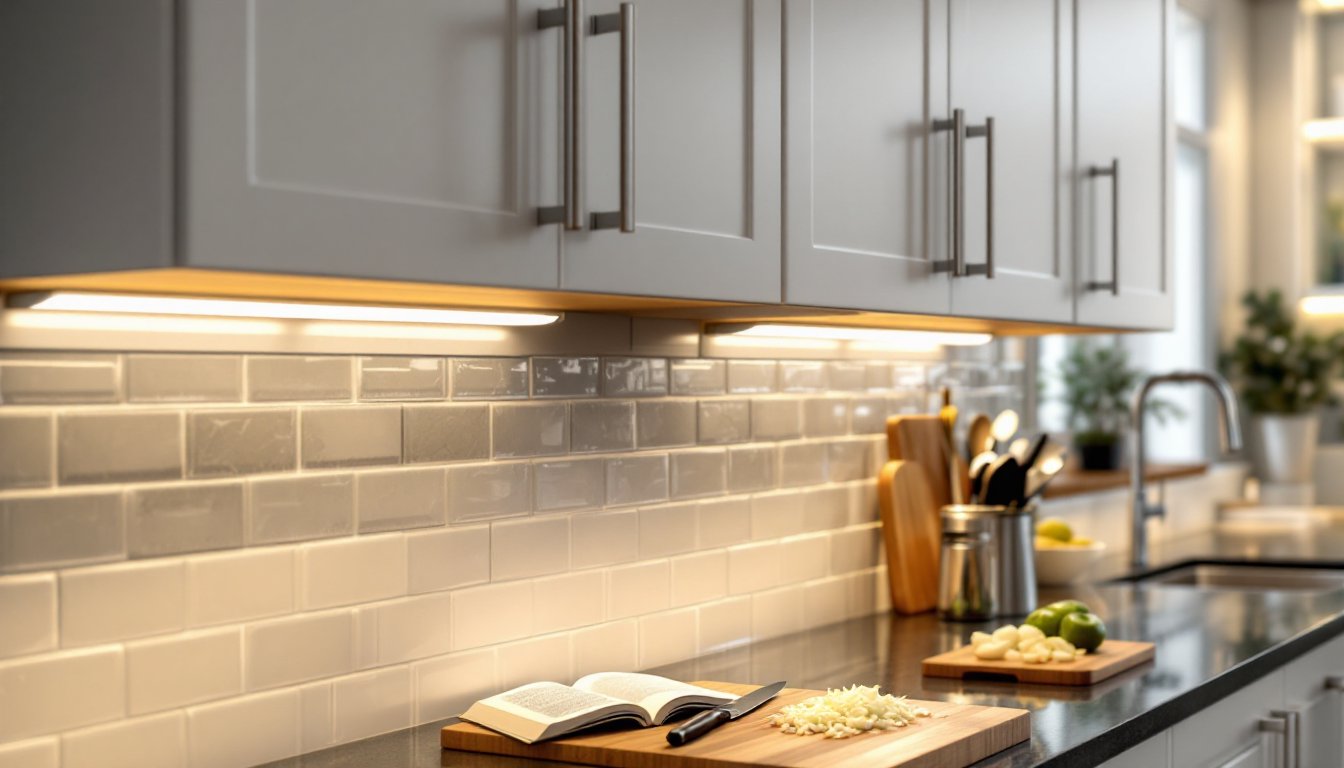
Under cabinet lighting mounts to the underside of wall cabinets and directs light down onto countertops. It’s task lighting, designed to illuminate work surfaces, not the whole room. That narrow focus makes it incredibly effective for food prep, reading recipe cards, and spotting crumbs.
Good under cabinet lighting eliminates shadows cast by overhead fixtures. Most kitchens rely on recessed cans or a central ceiling light, which creates a silhouette of anyone standing at the counter. Under cabinet fixtures fill in that gap, putting light right where hands are working.
Beyond function, these fixtures add ambience. Dimmed or color-tunable LEDs can create a soft glow for evening entertaining. They also highlight backsplashes, especially tile, stone, or glass, turning them into a design feature instead of a flat backdrop.
This isn’t structural work. No permits are typically required unless hardwiring into a circuit that involves new junction boxes or running cable through walls. Plug-in models need only an outlet and basic hand tools. Hardwired installations may require an electrician, especially if the home’s electrical panel is already loaded or circuits need upgrading to meet NEC (National Electrical Code) requirements.
Anyone comfortable with a drill, wire strippers, and a voltage tester can tackle most plug-in or low-voltage DC installations. Hardwired AC fixtures demand more care, turning off the breaker, testing for live wires, and securing connections inside a junction box.
Types of Under Cabinet Lighting: Finding the Right Fit for Your Kitchen
Three main styles dominate the market. Each has strengths depending on budget, cabinet layout, and how polished the install needs to look.
LED Strip Lights
LED strip lights are flexible ribbons with adhesive backing, usually 12V DC. They’re the go-to for curved or angled cabinets and tight spaces. Strips come in reels, common lengths are 16.4 feet (5 meters), and can be cut at marked intervals, typically every few inches.
They’re cheap, easy to install, and dimmable with compatible controllers. But they’re also the least refined. Light output can be uneven, with visible “hot spots” if the strip sits too close to the backsplash. Adding a diffuser channel, an aluminum extrusion with a frosted plastic lens, smooths the light and hides the diodes. That adds cost and install time but makes a big difference in appearance.
Color temperature matters. 2700K–3000K is warm white, good for traditional or cozy kitchens. 4000K–5000K is cool white, better for modern spaces or detailed tasks. Some RGB or tunable white strips let users adjust on the fly.
Power supplies (drivers) usually plug into a standard 120V outlet. Check the wattage rating, most strips pull 4–5 watts per foot. A 10-foot run needs a 50W driver minimum, with headroom for reliability.
Puck Lights
Puck lights are small, round fixtures, typically 2–3 inches in diameter, that mount individually under cabinets. They work well for spot lighting or highlighting specific areas, like a coffee station or cutting board zone.
Spacing matters. Place them 12–18 inches apart for even coverage, closer if the cabinets are shallow. Too far apart and dark gaps appear between each puck. Too close and the light becomes harsh.
They’re available in plug-in, battery, and hardwired versions. Battery-powered pucks are the easiest install, peel, stick, done, but they dim over time and require AA or AAA replacements every few months. Plug-in models offer consistent brightness. Hardwired versions look cleanest but need a junction box and proper wire connections.
Be honest: pucks rarely provide uniform task lighting across a long counter. They’re better as accent lights or supplements to other fixtures. Projects that require focused task illumination often benefit from a different approach.
Linear Light Bars
Linear light bars are rigid, enclosed LED fixtures that mount under cabinets like a miniature fluorescent tube. Lengths range from 12 to 48 inches, with some models linkable end-to-end for seamless runs.
These deliver the most professional result. The housing hides the LEDs, the lens diffuses light evenly, and the finished look rivals factory-installed lighting. They’re the top choice for new builds or serious remodels.
Installation is straightforward: mount with screws or clips, run low-voltage wire between units if linking, and connect to a power supply or hardwire to a switch. Some bars include integrated drivers: others need an external transformer.
Cost is higher, expect $25–$60 per bar depending on length and brand, but the results justify it. Light output is measured in lumens per foot: aim for at least 200–300 lumens/ft for solid task lighting. Lower and it’s decorative: higher can be glaring without a dimmer.
Many pros recommend brands like Kichler, WAC Lighting, or Armacost for build quality and warranty support, though budget-friendly options from big-box stores work fine for most DIYers.
How to Choose the Best Under Cabinet Lighting for Your Home
Start with color temperature. Kitchens need task lighting, so 3000K–4000K is the sweet spot, warm enough to feel inviting, bright enough to see clearly. Avoid anything above 5000K unless the space is ultra-modern or clinical.
Next, brightness. For task lighting, target 300–500 lumens per linear foot of counter. A 6-foot section of cabinets needs roughly 1800–3000 lumens total. Too little and it’s mood lighting: too much and it’s an interrogation room. When learning how to light workspaces, matching the fixture output to the task is essential.
Dimming capability isn’t optional, it’s essential. Full brightness is great for meal prep: 30% is better for late-night snacks or ambient glow. Not all LED fixtures dim smoothly. Check compatibility with the dimmer switch or controller. Cheap drivers can flicker or hum when dimmed.
Decide between plug-in and hardwired. Plug-in models are faster, cheaper, and require zero electrical knowledge. The downside: visible cords and a nearby outlet. Hardwired installs look cleaner, integrate with wall switches, and don’t clutter the backsplash. They also add time and cost, plan on a few hours or hire an electrician if the circuit needs modification.
CRI (Color Rendering Index) affects how food and finishes look. A CRI of 80+ is acceptable: 90+ is excellent and worth the small upcharge. Low-CRI LEDs make reds look muddy and greens look sickly.
Think about control options. Basic on/off works, but motion sensors, timers, and smart integrations (Alexa, Google, HomeKit) are increasingly common. Smart controllers add $20–$50 but enable automation and remote dimming.
Finally, measure the space. Know the exact length of each cabinet run, the depth from front to back, and whether there’s a lip or trim that could interfere with mounting. Many common lighting tips emphasize measuring twice before ordering anything.
Step-by-Step Installation Guide for DIY Under Cabinet Lighting
Safety first. If hardwiring, shut off power at the breaker and confirm it’s dead with a non-contact voltage tester. Even plug-in installs benefit from safety glasses when drilling.
Tools and materials:
- Drill/driver with bits
- Wire strippers (for hardwired installs)
- Level or straightedge
- Measuring tape
- Pencil
- Screws or mounting clips (usually included)
- Cable staples or clips (for wire management)
- Electrical tape
- Wire nuts (if hardwiring)
Step 1: Plan the layout. Hold fixtures under cabinets to visualize placement. Position lights toward the front edge (about 2–3 inches back from the face) to avoid shadows from cabinet doors. Mark mounting points with a pencil.
Step 2: Prep the surface. Wipe the underside of cabinets with rubbing alcohol or degreaser to ensure adhesive or screws hold securely. Dust and grease are the enemy of both.
Step 3: Mount the fixtures. For adhesive-backed strips or pucks, peel and press firmly for 30 seconds. For screw-mount bars, drill pilot holes (usually 1/16-inch) to prevent splitting, then secure with the provided screws. Use a level to keep everything straight, crooked lights are glaringly obvious.
Step 4: Run the wiring. Plug-in models need a path to an outlet. Use adhesive cable clips or small staples to secure low-voltage wire along the cabinet’s back edge or underside. Avoid placing wire where it could rub against the backsplash or get pinched by cabinet items. For hardwired installs, run 14/2 NM-B (Romex) from the fixture to a junction box, securing it every 4.5 feet per NEC code. Connect black to black (hot), white to white (neutral), and bare copper to ground with wire nuts. Many lighting installation fundamentals stress proper wire routing to prevent damage over time.
Step 5: Connect power. For plug-in setups, connect the driver to the fixture leads (usually push connectors or screw terminals), then plug into the outlet. Test before securing everything permanently. For hardwired, cap connections in the junction box, secure the cover plate, restore power, and test.
Step 6: Adjust and fine-tune. If the light has a dimmer or color control, set preferences. Step back and check for hot spots, dark zones, or uneven coverage. Add more fixtures or adjust spacing if needed.
Common mistakes to avoid:
- Skipping the test fit. Always dry-fit before committing to adhesive or drilling.
- Ignoring wire gauge. Low-voltage runs over 10 feet may need thicker wire (18 AWG minimum) to prevent voltage drop and dimming.
- Mounting too close to the backsplash. This creates harsh reflections and visible diodes.
- Forgetting to account for cabinet trim or crown molding that blocks mounting.
If the space has complex angles or multiple cabinet levels, sourcing creative fixture ideas from design-focused sites can spark solutions. Some DIYers adapt off-the-shelf components using modular approaches to save cost without sacrificing function.
Budget 1–3 hours for a basic plug-in install on a standard 10-foot run. Hardwired jobs with multiple circuits or new switches can stretch to a full day or more. If the electrical panel is outdated, full, or aluminum-wired, call a licensed electrician. Saving a few bucks isn’t worth a code violation or fire hazard.


